AI Implementation Guide
Understanding MCP (Part 2)
Deep dive into the Model Context Protocol and its role in AI agent systems
Agentic coding workflows with Claude Code : Understanding MCP : Part 2
Understanding MCP (Model Context Protocol)
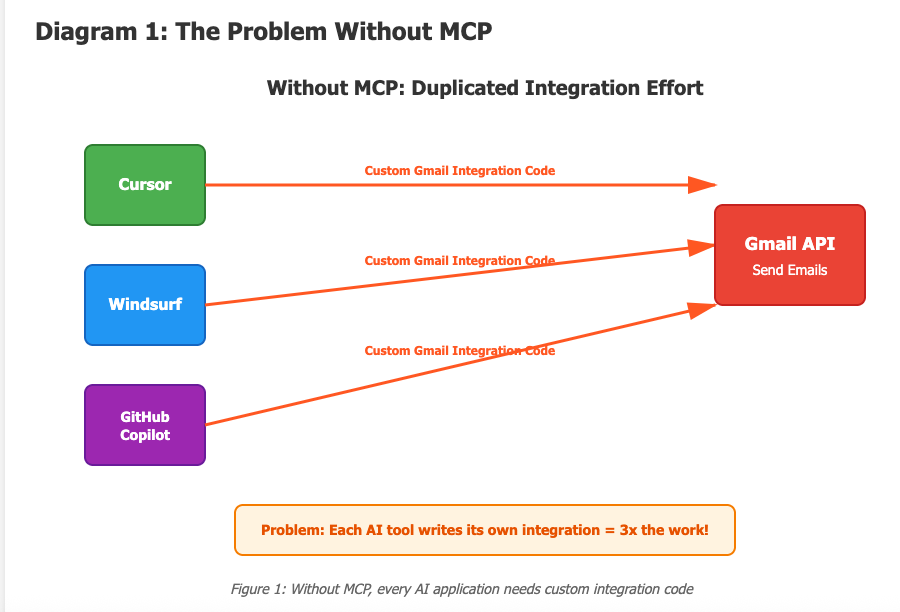
Why Do We Need MCP?
Imagine you’re building an AI agent that needs to:
- Send emails through Gmail
- Query databases
- Order food from Swiggy
- Access weather information
Traditionally, each AI application (Cursor, Windsurf, GitHub Copilot, Bolt, Lovable) would need custom code to implement these integrations. That’s a lot of duplicated effort!
The Problem Without MCP
Without MCP, if you wanted your agent to send emails via Gmail:
- Cursor team writes custom Gmail integration
- Windsurf team writes their own Gmail integration
- Bolt team writes yet another Gmail integration
- Every AI tool reinvents the wheel
This approach creates:
- Massive code duplication
- Maintenance nightmares
- Slow adoption of new features
- Vendor lock-in
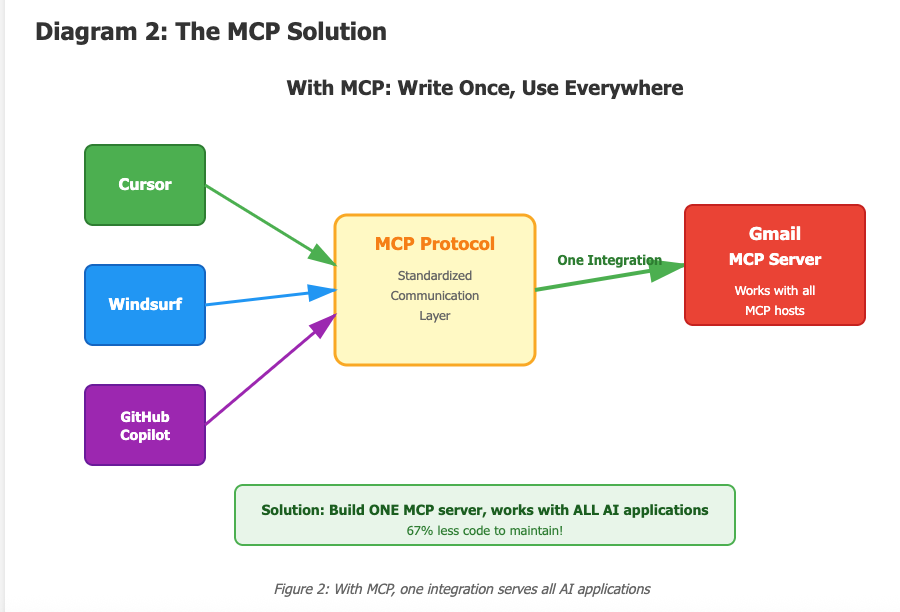
The MCP Solution
MCP acts as a universal adapter between AI applications and external tools/data sources. Write your integration once, and it works with any MCP-compatible AI application.
Key Benefits:
- Write Once, Use Everywhere: Build one MCP server that works with Cursor, Windsurf, and any other MCP-compatible tool
- Vendor Independence: Not locked into any specific LLM or AI application vendor
- Rich Ecosystem: Access to 30,000+ pre-built integrations
- Standardized Protocol: Like USB-C for AI applications
MCP Architecture Explained
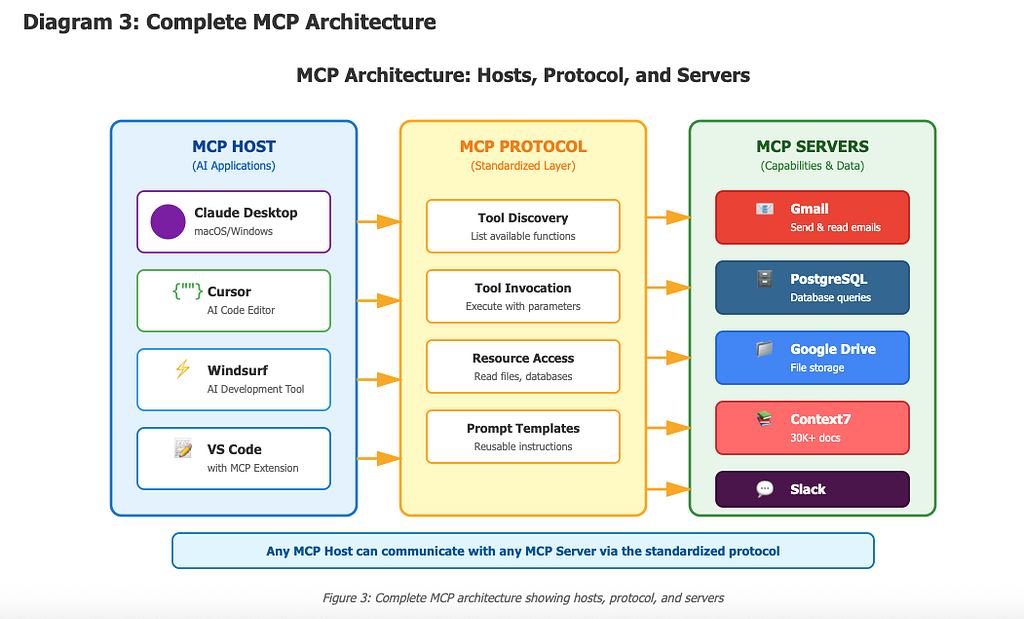
The Three Components
1. MCP Host (Left Side)
- Your AI application: Claude Desktop, Cursor, Windsurf, VS Code with extensions
- These are the “clients” that want to use external capabilities
2. MCP Protocol (Middle)
- The standardized communication layer
- Defines how hosts talk to servers
- Can work locally or over HTTP
3. MCP Server (Right Side)
- Provides specific capabilities:
- External APIs (weather, payments, etc.)
- Database access (PostgreSQL, MongoDB)
- File systems (Google Drive, local files)
- Web services (GitHub, Slack)
How It Works
Hands-On: Adding Context7 MCP to Claude Code
Context7 is a powerful MCP server that provides up-to-date documentation for 30,000+ packages. This is crucial because AI frameworks change rapidly.
Step 1: Install Context7 MCP
In your Claude Code terminal:
claude mcp add --transport http context7 https://context7.com/api/mcp
Step 2: Restart Claude Code
After adding an MCP server, you must restart:
# Exit Claude Code (Ctrl+C)claude
Step 3: Grant Permissions
When Claude Code restarts, it will:
- Detect your new MCP configuration
- Ask for permission to connect to MCP servers
- Create a settings.json file with your preferences
Select “Yes, allow” when prompted.
Step 4: Verify Installation
List your MCP servers:
/mcp
ou should see Context7 listed with status “connected” and two available tools:
- resolve_library_id - Identifies the package you're asking about
- get_library_docs - Retrieves the relevant documentation
Step 5: Test It Out
Ask Claude Code a question:
What is the latest version of dbt-snowflake? Use context7 MCP.
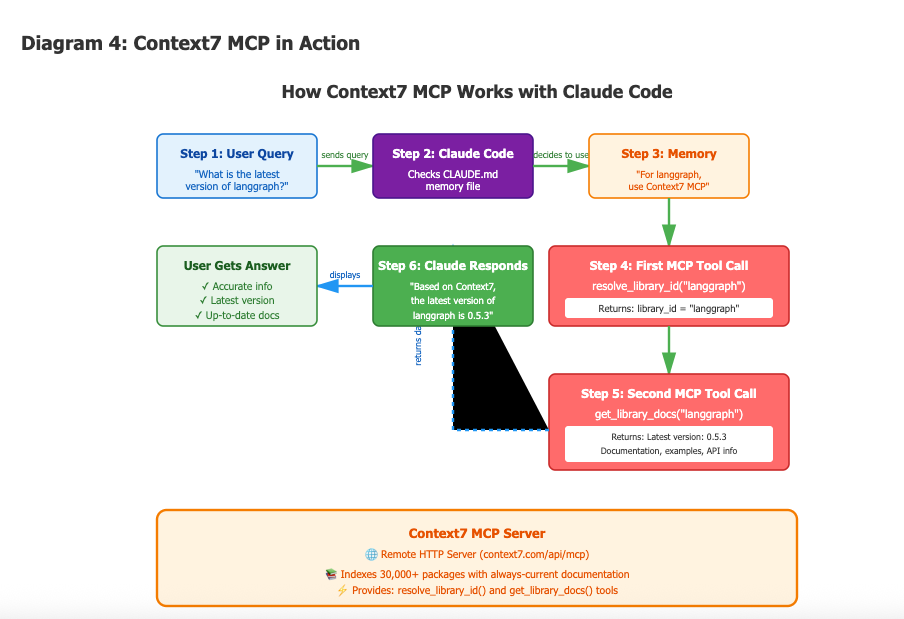
Claude will:
- Call resolve_library_id to find the langgraph package
- Call get_library_docs to get the documentation
- Return the latest version information
Step 6: Set Up Project Memory
Make Claude automatically use Context7 for specific topics:
# Remember: Every time I ask about langgraph, use the context7 MCP
Save this to project memory so it persists across sessions. Claude will create a CLAUDE.md file with this instruction.
Understanding the Configuration Files
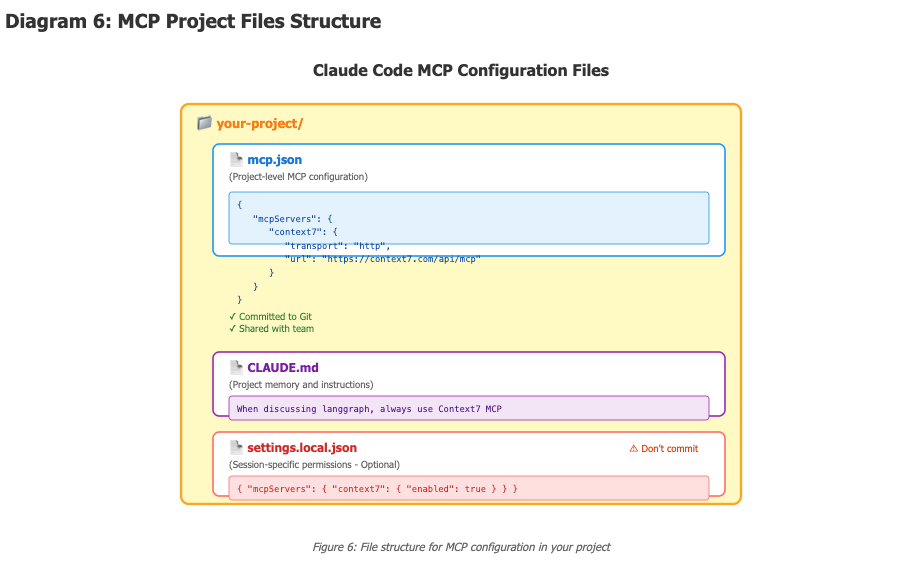
After setup, you’ll see new files:
mcp.json (Project-level configuration):
{ "mcpServers": { "context7": { "transport": "http", "url": "https://context7.com/api/mcp" } }}
settings.local.json (Session permissions):
{ "mcpServers": { "context7": { "enabled": true, "alwaysAllow": ["resolve_library_id", "get_library_docs"] } }}
Real-World Example: Getting LangGraph Documentation
Let’s see Context7 in action:
User: “What is a langgraph interrupt?”
Claude Code Process:
- Checks CLAUDE.md memory → sees instruction to use Context7 for langgraph questions
- Calls Context7’s resolve_library_id tool
- Calls Context7’s get_library_docs tool
- Retrieves latest documentation about interrupts
- Provides answer with current API usage examples
Result: You get accurate, up-to-date code that matches the latest langgraph version, not outdated examples from Claude’s training data.
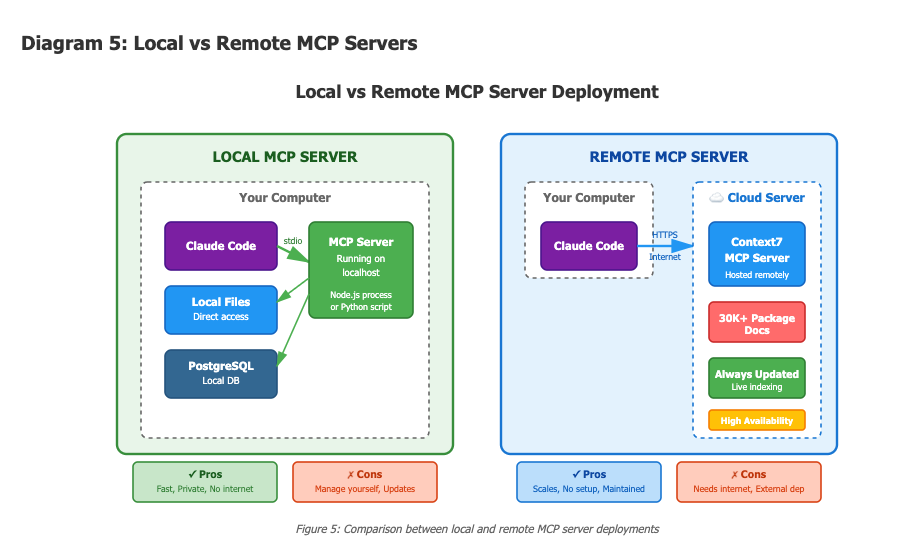
Local vs Remote MCP Servers
Remote MCP (Context7)
- Transport: HTTP
- Location: Runs on Context7’s servers
- Pros: Scales well, no local setup, maintained by provider
- Cons: Requires internet, depends on external service
Local MCP
npx -y @context7/mcp-server
- Transport: stdio
- Location: Runs on your machine
- Pros: No internet needed, full control, privacy
- Cons: You manage updates, uses local resources
Committing Your MCP Configuration
Save your setup to GitHub:
git add .git commit -m "Add Context7 MCP configuration"git push origin master
What’s Next?
In the next part, we’ll explore:
- Building custom MCP servers
- Creating your own integrations (Swiggy ordering example)
- Advanced MCP patterns and best practices
- Security considerations for MCP servers
Key Takeaways:
- MCP eliminates duplicate integration code across AI tools
- Context7 provides always-current documentation for 30,000+ packages
- Configuration is simple: one command to add an MCP server
- Project memory makes Claude automatically use the right tools
- Both local and remote MCP servers are supported
This article is also published on Medium.